Good Morning!!!
And a huge WELCOME to all of my new followers!
I'm so happy to see you!
I have been cruising Pintrest and Two Peas In a Bucket's General Scrapping Forum as well as tons of blogs, checking out how everybody approaches their album.
Maybe it's the Mrs. Kravitz in me, but I love checking out other people's albums!
I've also noticed that there definitely a variety of approaches to how you organize your album.
Very cool.
I decided that I wanted to share my approach with you, since I didn't find anyone who works quite the way I do.
I'll start with supplies.
I started by buying the Cobalt Album & Core kit, as well as the monthly dividers and lots of refill pages (I ordered in December, before they were all sold out, though I think I'm going to have to order more when they come back in over at Amazon.)
When they got here, I LOVED them.
BUT
I am very much NOT a purist, with anything really.
And maybe it's my inner 3-yr-old, but I get bored kinda easy.
So then, I ordered the Turquoise Core Kit.
Love it too!!
Then, thanks to my obsession with Pintrest, I found a bunch of places that offered printables-- both free and paid and I bought & printed some of those.
Then I discovered that my local Hobby Lobby carries some 7Gypsies ATC supplies, so I picked some of those up.
Then I found an old 12x12 post bound album kit with some papers & embellishments that matched the Cobalt kit really well, so those got added to the stash.
Then I put together my first few weeks of pages and felt like there was starting to be a little too much repetition, so I ordered the Clementine kit.
It just came a few days ago and it is FABULOUS!
*sigh*
I have enough product to make 5 albums.
But they'll be super-cute ones!!!
As of now, I have no organizational system for them.
All of the core kits are in their boxes and everything else is in a plastic 12x12 sleeve.
Mostly, it works, but it's kind of a pain to find what I want, so I'm working on some sort of system.
Once I get it figured out I'll share it.
For today, I wanted to show how I approach the album itself.
I started by making myself a planner.
Well, actually, I made 2-- one for the daycare & one for us.
This is the daycare planner.
Supplies: Chipboard, Punch: Fiskars, Patterened Paper: Debbie Mumm for JoAnn, Cardstock: DCWV, Cricut Font: Nate's ABC's, Bind It All & O-Wires:Zutter
(Yeah, I know the O-Wires are in backwards. I fixed them, but had already taken the photos & decided to just go with it.)
I covered the front & back of the planners with PP, then added free printable calendar pages that I found online & free PL planner pages from Amy Jaz Designs that I printed & photo copied.
I use the calendar pages to track bills & which kids will be in attendance on which days, then use Amy's pages to make notes of things that happened on a particular day & what photo I intend to use for my POTD.
The third page is a basic layout sketch for each page.
Sometimes I use this one, sometimes I skip over it, since I don't always use the Design A page protectors.
My personal planner is exactly the same, except I didn't put the calendar pages in it.
So I'm organized in some places, but not in others.
But I'm working on it.
The album that I'm sharing is my personal album.
Here is my Intro page
First, I wanted to note that, while I am sharing a few of my pages, I am not posting them all.
This is just a small sampling so you can get the idea of how I do it.
I know that most people seem to organize one week into a two page spread, but that just doesn't work for me.
I don't really separate them in any way.
I simply started on Jan 1 and kept going.
I use the Day of The Week stickers that come in the core kits on the photos themselves, so that my reader can keep straight the days straight.
I used the clear ones with the white lettering for my January pictures, so they are hard to see in these photos, but I switch to the colored ones from the Cobalt kit for Feb.
I think I'll keep switching them out each month, to help differentiate a little between the months.
I also date each journaling card.
I love these calendar pages that came with the Turquoise kit.
I plan to use them at the beginning of every month with the important dates noted on them.
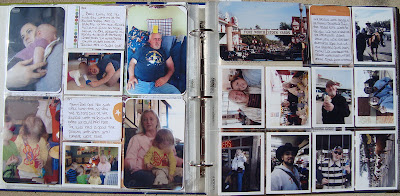
All of these pictures on these 2 pages are from Jan 1 & 2.
We were home together for those two days, and I took a lot of photos that I wanted to include, so I did.
Some of my pics are a little dark, but they are what they are, and that's ok with me.
I also wanted to note that with some pictures (like the one on the top right) were taken vertically.
Obviously, vertical pics don't work in this particular page protector, so I trimmed it to 4x4 & added a chunk of coordinating pp (I did not buy the PP from BH, I used some that I already had that I think works with the Cobalt kit.) to make it 4x6.
Or, you could just turn the photo on it's side.
Which I have done on several of my pages.
On this page, I had an "empty" spot, so I popped a filler into the 2x3 spot and used the 4x6 to make note of my One Little Word for 2012.
(I'll be posting some of my OLW pages in the near future.)
This is an 81/2x11 page protector that holds my program & receipts & tickets for an event that I attended on this date, behind it are lots & lots of photos in a Design F page protector.
All of the photos are from the same day.
Front
Back
I am totally in LOVE with the Design F protectors.
I hope to get some more of them when they come back in stock on Amazon in April.
I'm missing a photo here, on the top left.
I took the one that goes there, but it came out super-blurry.
Thankfully, it's a photo of something in my home, so I can re-take it.
I left a little note in that spot so I don't forget what goes there.
I also jazzed up that filler in the bottom right corner, but forgot to re-take this pic.
But you get the point.
The is the right side of that LO.
The pics on the top half are all from one day, with the long journaling on the right explaining them.
I trimmed & glued 2 of the basic grid journaling cards to a 4x6 to journal the other 2 days.
Then I added a picture of Ed Dog to the empty spot.
Because you just can't have too many pictures of Ed Dog.
The dates that fall in this LO are when my parents came to visit.
I am still trying to catch-up from past years, so I don't think I want to do a bunch of 12x12 LOs this year.
Instead I am going to include all of the photos I want in my PL, even if it means multiple albums.
(baby faces blurred for obvious reasons)
I added a 6x12 sleeve here to hold the museum brochure & some receipts from our day.
I trimmed it to the top of the brochure & added a couple of glue dots at the top to keep them from sliding out.
All of the photos in the 2 layouts previous are from 1 day.
I added some cute blocks cut from a Simple Stories Paper to this.
I know Becky created some digital jounraling cards in a horizontal format, but I haven't checked them out yet.
I'm happy to make use of what I've got.
(Can you hear that?
That's Steve cheering because I'm actually using my stash.)
This is where I switched over to the Month of February & added my tabbed divider.
I think I might stamp on them or something to give the dividers a little personality.
Hmm... Something to think about.
These are all plain, grid jouranling cards with chunks of PP attached.
So that's it for now.
If you have any questions on how I did something, please feel free to contact me.
Or, if you want to share your album, please please leave me a link in the comments section!


 I Love TheHIVE


.JPG)


Great planner and PL. Thank you for sharing your approach to the project.
ReplyDelete