Hello out in Blogland!
Tonight's post is a super-quickie, as it's New Year's Eve and we've got some celebrating to do!
(Ok, ok. This year "celebrating" is loosely defined as "Parking my pregnant butt on the couch with some left-over Christmas cookies & watching SVU re-runs with Steve until we both fall asleep, somewhere around 9:30", but hey-- a celebration is a celebration.)
I wanted to give you a quick rundown of how I organize my Project Life supplies, in case anyone is taking advantage of their day off tomorrow to get ready for the 2013 album.
(Which I will totally not be doing. I plan on "celebrating" until forced to move by threat of death & dismemberment, or worse, lack of food.)
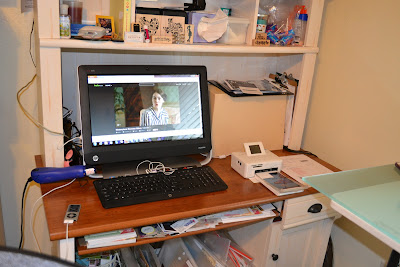
I'm going to start with my computer desk.
It sits at a right angle with my work desk, making an upside down "L" shape.
Mostly.
My work desk is at counter-height & move computer desk is at regular desk height, so they don't really meet in the middle, but you get my drift.
That glass thing there in the bottom right corner is the corner of my work desk.
And yes, I had Downton Abbey streaming on Hulu when I took this picture.
I start here because I purchased a Canon Selphy CP800 photo printer last year & it has been the best thing EVER for keeping my PL up to date.
I can choose, edit & print my photos in just a few minutes & get a day or two done at a time, rather than ordering a bunch from the printer & always feeling weeks behind.
I also use the keyboard tray for the pages that I'm working on right now.
(My keyboard is wireless, so I tend to toss it into un-used corners to free up flat surface working space.)
On this pull-out tray I keep:
- 6x6 Paper Pads-- I only have a couple & I only use them for PL, so this works for me.
- Recently printed digital journaling cards that I haven't cut apart & filed yet
- Printed photos
- Random
crapephemera that I saved to go onto my pages - Any particular stamps or stickers or supplies that I have pulled for that particular month's photos
I find it works well for me to have these things that I use often close to hand, but not cluttering up my desk. This is also a nice, safe landing space for any pages-in-progress that I have to move off my work desk for whatever reason.
This letter organizer sits directly on my desk.
I keep my small trimmer, a medium size stamp-block, a few basic ink colors and my Smash & Amy Tangerine roller stamps here.
These are tools I use on almost every layout, PL or not, so they are close by.
If I swivel my awesome drafting chair around, directly behind my desk, you see this:
As you can see, there's all kinds of stuff on this shelf, but tonight we're just going to talk about PL goodies.
Cuz, other than the ones on the keyboard tray, this is where my PL Stash lives.
In easy reaching distance.
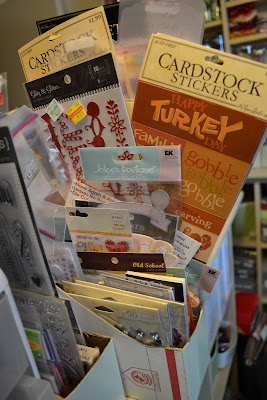
I have 2 of my home-made paper holders filled with paper scraps, stickers & whatnot that I've collected.
Underneath those are stamp binders.
I keep my Ali Edwards stamps in one (I use those ALLL the time! Totally love them!)
And I keep a second binder of stamps that I seem to use a lot in my PL.
They are just slipped into clear page protectors, but it works for me.
They definitely get used more in this binder than they would if they were in a bin somewhere.
In this little bucket, I keep odds & ends.
Labels & other small stuff that gets lost in a bigger bin.
But the bulk of my stash is in here:
You see, I started with a core kit.
Then another & another & another & now there's a bunch of them.
And printables-- all kinds of printables.
And Baby stuff.
It's craziness.
So to make sure I actually use all of them, I had to organize them some how.
I had these little boxes that I bought at JoAnn's 4-5 years ago that were perfect.
(I don't know if these are available anywhere anymore, but Hobby Lobby carries small Art Bins that work in a similar fashion.
They don't have lids, but are made to stack, so they would still work.
If I can find a link, I will post it later.)
I cut up file folders to make dividers for the inside & then just broke them up in a way that made sense to me.
Becky Higgins Core Kits are in this one, separated by kit.
All of my 4x6 pieces are in this box.
Some are from Core Kits, some are We R Memory Keepers pads bought at Target, some are quotes I found online & printed on photo paper.
This one holds other journaling cards that I found-- Ali Edwards new ones, some Smash Pads, some Jenni Bowlin pads, some digital ones that I printed myself on cardstock and some ATC cards that I use as fillers.
The last are for Baby's album.
He's not due until late March, so I won't be really doing much with his album for a few more months, but I figured I should get it done while I was still motivated to organize.
That's my whole system.
Simple, right?
Keep it organized & close by, but not underfoot.
If you have nay questions about how I did something, please leave it in the comments section & I will get back to you ASAP.
Don't forget that tomorrow's post will be filled with lots & lots of photo-taking inspiration for January, so make sure you check back.
Happy 2013!!!


 I Love TheHIVE


.JPG)


Hi. I will start with Project Life this year. My kit should arrive within the next days, I am so excited. Yesterday I saw a Selphy 900 in a shop and now I am thinking if this would be a good option to go with for my project. I think it makes it easier if you can print at home inszead of waiting for your pictures. Could you please let me know, if you are happy with your Selphy. I read that the size of the picture is not 4x6. Is taht right? Do you see the difference after putting the picture into the protectors? Can you also print smaller sizes (e.g. 2x3)? Thank you for your help. Regards from Switzerland!
ReplyDelete