Monday, March 21, 2011

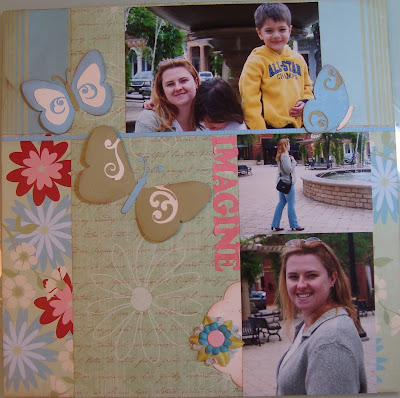
Imagine


It's a beautiful day in the neighborhood.  

Sunny, low 80's, breezy enough to be cool.  

Beautiful!

Spring is definitely in the air here in Texas.

 I felt the need to create something pretty & spring-ish to go along with this pretty spring weather.

 This is a layout for my BOM. 
The photos were taken Easter Sunday 2007, just a couple of weeks after I moved down here to TX.
I had just split up with my now-ex husband and was really struggling with it.

Thankfully, I had a really good friend here in TX that was there for me to lean on and to take me out to The Cheesecake Factory for Easter dinner.  

I don't know what I would have done without her.


Now, I look back at these photos and see myself a little differently.

I was on the verge of becoming someone entirely new, I just didn't know it yet.

Someone much stronger, more independent and with way better hair!
That's why I chose to use the butterflies on the layout.  

They were a good symbol of what was to come.


This layout was also a good "use-it-up" project. 
The pictures are 4 years old.
The paper is some that I've had for so long that I don't even know who made it.
The pink letter stickers are from a DCWV Spring Sticker Stack from a couple of years ago.
The little skinny blue ribbon is left over from some baby shower invitations that I made 3 years ago.
The tag was cut with an old-school Sizzix die--one of the very first ones I ever bought.
The cardstock for the butterflies is all scraps.

The only new thing that I used is my Serenade Solutions Cricut Cartridge.
It's one that I have wanted for quite  a while now & when they announced that it was retiring, I decided it was time to get it before it got super expensive.

If it's one you don't have, I would highly recommend it.  
There are so many beautiful beautiful images on it.

Alrighty--
enough about pretty paper butterflies.
Time to go outside & enjoy some real ones!

Happy Monday Friends!


Wednesday, March 16, 2011

Sketchy Challenge


Good Morning!  Good Morning!

It's another Design Team Challenge Day!

Today's Challenge is a super-cute sketch
 from Liz at The Scrappiest.


This is the page that I submitted to ScrapFit  for the challenge

about my favorite little helper

 This cute little kitty came from the Cricut Lite Meow cartridge.  I've just been looking for an excuse to use it!
Supplies: PP:Colorbok, Cardstock: DCWV, Letter Stickers: Story Tellers Club, Yarn: Retail, inc.

This page was so quick & easy using the sketch that I had time to make a couple more. 

I decided to use the same sketch for all of them.

Supplies: PP, Stickers, Flowers: Cloud Nine Designs

 
This page was another challenge all together. 
 In the moving process, I discovered a stash of monthly page kits from Story Tellers Club
I belonged to them for a year or so in 2008, but hardly ever used my supplies. 
No idea why- they're as cute as can be!

I guess because they were stored out of sight, so I never thought to pull them out.

Well, they're out now!!

On this page, I challenged myself to not only use the sketch, but to use one of these kits-- and ONLY the kit. 

Every single item on this page (even the bling!) is out of the April 2008 kit.
And I LOVE it. 

 
The cardstock is hard to see in the photo, but it has a fabulous texture to it that I'm totally in love with.
Supplies: Story Tellers Club

You will definitely be seeing more pages using these kits coming soon!

My last page is my favorite.  
I wanted to do something for St. Patrick's Day and these photos were perfect!


 This happy little guy is from the Cricut Simply Charmed Cartridge.  He was just so cute I couldn't resist him!  He's the reason I wanted to do a St. Pat's page!

These little shamrocks made me so happy!  
I used a punch that I've had for so long that I don't even know who made it. 
(I think it's a Fiskar's but I'm not sure)
I can't remember the last time I used one of these little punches, so the fact that I had the opportunity, remembered that I had it & knew where it was, all at the same time has to be some sort of St. Patrick's Day miracle.
Supplies: Cardstock & P:DCWV, Letter Stickers: Colorbok, Punches: Fiskars & ?, Other: Stickles
4 pages in just a couple hours has got to be some sort of record for me. 

I will definitely be visiting Liz for more sketches soon!

Don't forget to visit ScrapFit (linked above) to see what a great job the other Fit Girls did with this one. 
Lots of inspiration there -- and an opportunity to win a great prize package from The Paper Trail.

Hope you all have a very happy Tuesday.

Tuesday, March 8, 2011

Feeling Lucky?


Hello out there in Blog Land!

I hope you all are having a lover-ly day.  

(Can you tell I've been listening to show tunes? )


So, it's Officially March, as of a few days ago. 

And March means--


ST. PATRICK'S DAY!

I love St. Patrick's Day!  

I love holidays in general- I'll take any excuse to get dressed up & have a party, but since my family are Irish (among other things), St. Pat's is way up at the top of the list.

And any holiday is a good excuse to make cards!

(I haven't come up with a cute St. Pat's card yet this year, but I wasn't blogging yet at this time last year, so I figured that showing you last year's card is only kinda sorta a little bit cheating)


As always- I had to do a couple of slight variations


Inside:

Supplies: Cardstock & PP: DCWV, Ribbon: Wrights, Stamps: Stampin' Up, Studio J, Cricut Cartridges: Storybook, Forever Young, Bling: Unknown, Stickles

At the time that I made these, I had just gotten my Forever Young Cartridge and was itchin' for something to use it on, but just couldn't come up with any ideas.

Then 2 days after it arrived, I woke up at 3:30 am with this picture in my head.
I couldn't get back to sleep for anything, so I got up & started working on them.

Steve got up around 5:30 as usual, to get ready for work and made a comment to the effect of 
"I can barely drag you out of bed at 7 to go to work, but you'll get up at 3:30 to come & scrapboook??"

Yup.

That's just the way life with a scrapper is, honey.

Better get used to it!


Thursday, March 3, 2011

Home-Made Vertical Paper Holders

Good afternoon Friends!

It is a gorgeous 76* here in Dallas right now and the sun is certainly shining.

I wanted to say thank you thank you to all of you for the wonderful comments that you made about my new studio.
I absolutely love it, and all of the love from ya'll just makes me enjoy it even more!

I've had a bunch of people ask about my home-made paper holders, so I wanted to show you how I made them.


I used medium size flat rate shipping boxes from the Post Office.  
(NOTE: You'll want to use recycled boxes, not new ones.  Although the PO Employee that handed me the ones I used knew exactly what I planned to do with them and said that she thought it was a great idea, I read online later that grabbing new ones from the PO for any purpose other than shipping is illegal.  I certainly don't want to encourage you to engage in any sort of criminal behavior. )

You will need: 
Medium size shipping box, metal edge ruler, pen, cutting mat (I used 2), box cutter, sharp scissors and a sturdy work surface

I started by marking both sides of the box.
I lined up the edge of my ruler with the fold in the box. On the left side I measured up 3 1/2", on the right side 9 12".  
I like the look of the flat indent on the top & bottom, rather than a straight diagonal, so I drew a straight line across the width of my ruler at those heights, then drew the diagonal from the inside edge of each line.


Then you want to continue your line straight across the spine of the box to the other side.

Make sure that, if your 3 1/2" mark is on the left on the front side, that it is on the right on the back side, so that they will line up.  I ruined 2 boxes by not paying attention to this.  Oops!


Then all you have to do is cut them.  

I put a small cutting mat inside to prevent me cutting through to the other side accidentally and then put another mat under the whole box to prevent my cutting off the edge of the box & nicking up my work surface.


Once I got both sides cut, I took the mat out of the box & opened the box out so that I could cut through any remaining spots.


Separate them & attach the self stick tabs on the top & bottom.

Use the scissors to trim off any frayed edges 


and **voila** you have 2 identical vertical paper holders.

(Repeat as many times as necessary to hold all your paper- in my case, 14 more times)

There are a lot of options for decorating them to match your space.

You could:
*decoupage 
*attach patterned paper
*attach fabric
*let your 4 year old color them with crayons

In my case, I took the cheapest and most lazy-girl effective route:
Spray Paint
(Krylon in Celery Green, to be exact)


I used 3 cans of spray paint for 30 boxes 
(26 sit on top of my cubbies, the other 4 sit on the floor in the corner)

It took me 5-6 coats each to totally cover the red ink on the boxes, but this might be less if you were to use a darker color.  
I also got smart after painting the first 4.  

My boxes all sit in a row on 2 shelves.

There is no need to do 6 coats of paint on every single surface, because you don't see them!

I only painted the front edge and back edge on most of the boxes, saving my paint for the sides of the 2 boxes the ends of the row.

It was the work of most of 2 days to get them all cut & painted & dry, but in the end I got this

 and I think it was totally worth the work.

If there's something that I didn't explain clearly or if you have any questions, please feel free to ask.

Happy crafting!

Wednesday, March 2, 2011

Studio Tour

It's Studio Day!

The happy happy day when I get to share my new studio!

(This should be some sort of day-off-work holiday shouldn't it?)

I just want to preface this with the fact that my studio is totally set up & functional, but not yet decorated.  

I'll post more photos when I get to that part.

For now, come on inside!
 This is the view from the door.  
I'd like to do something to jazz up the back of that shelf, but I'm not sure what to do with it yet.
 The bottom shelf unit holds paper stacks & albums.
The top shelf unit holds mat stacks, foam stamps, SU stamps in boxes, a few large punches & some misc. 
It's my least accessible unit, (being short stinks) so I put my less used items on it.
 This is my work table.  
I put a glass topper from an un-used coffee table on top & LOVE having the glass surface to work on. 
So much easier to clean off.
 That's my Cricut Table there on the right.  
At some point, it will get a table cloth (to hide all the stuff under it) and the window will get a curtain.
Baby steps.
 This is the cubby & shelf unit behind my work table.
All Primas on the shelf unit, in rainbow order of course.
The cubby holds buttons in jars, brads & eyelets, 8x8 paper, & my quote binders.
This is the cubby to the right of my work table.  
It holds my stamp binders & loose stamps in fabric bins.
I was able to sort all of my loose paper into home-made paper holders.  
I love love love these.  
I should have converted to vertical paper storage years ago.
I have 26 of them lined up on top of the cubbies in rainbow color order.

 This is my Cricut table.  
It holds my Cricuts & Jukeboxes (my Expression is not in the photo, but it lives here too), my large Tonic Trimmer, my Cuttlebug & folders and a 3 tiered basket that holds extra blades, Cricut Colors, my Gypsy & all the cords.

The 2 shelf units above the table hold Cricut cartridges. 
I have a bunch, but not enough to fill both shelf units, so I've got some misc. stuff hangin' out up there too.


 This little shelf behind my work table holds my Sizzix & dies, as well as my sketch binders & the binders that I keep printed copies of my SVG files in.
 This little shelf to the left of my work table holds movies, my adhesives, etc.
Both of these little shelves are just space fillers for now.
Eventually, I will get a computer desk to put here.
 This is the built-in bookcase in my studio.  
It's perfect for all of my scrapbook mags & idea books & a couple of decorative items.

 I put a screw in coat holder on the inside of the closet door to hold my ribbon rings.
 The closet had some built in shelves that I was able to use to hold my theme boxes.
 Any misc. ribbons & fibers go in the dresser drawers.
The top is still my drop spot, but I'm hoping to remedy that soon.
 On the right side of the closet, I pulled out a shelf & a hanging bar so that I could stack my Iris carts-filled with alphas & emblies.
 I was able to fit 5 Iris carts & a small filing cabinet.
The filing cabinet holds 8.5x11 cardstock.


I've still got a little bit of work to do on it, but mostly I'm really really happy with it.
My favorite thing is that I can sit at my work table & see almost everything I have, making me sooo much more likely to use things.

I'll do another post in a few days with more info on how I organized things.

Thanks for looking & I'd love to hear what you think!